Hisense dehumidifiers are easy to use and easy to maintain.
To use a Hisense dehumidifier, simply plug it into an outlet, turn it on, select your preferred mode (auto dry, continuous, or manual) and adjust the humidity levels. Then modify the fan speed (high, low, or auto), set a timer (30min-24hours) and enjoy perfectly humid air.
This guide will take you through how to use a Hisense dehumidifier, and how to clean and maintain each of the different models.
How to Use a Hisense Dehumidifier
The steps to use and maintain a Hisense dehumidifier differs slightly between each model. This guide applies to the following models:
- DH5022K1W (35 Pint)
- DH5020K1G (35 Pint)
- HT5021KP (Energy star 50 pint)
- DH7021K1W (50 pint)
- DH7021KP1G (50 pint)
- DH7021W1WG (Smart control 50 pint)
- DH10020KP1WG (60 pint)
- DH10019TP1WG (100 pint)
1. Set the Dehumidifier Upright
Your Hisense dehumidifier can be placed upside down or tilted during shipping. So, it’s important to set the dehumidifier straight and upright for about 2 hours before plugging it in and turning it on.
Make sure that the bucket is inserted well in the dehumidifier before plugging it in – Buckets that aren’t seated properly can stop the dehumidifier from turning on.
2. Switch on the Dehumidifier
Plug in the dehumidifier to a grounded three-prong outlet. Press the power button to turn it on.
3. Select Desired Mode
Press MODE to choose between auto dry, continuous, or manual mode.
- The Auto Dry mode automatically adjusts the humidity level to 50%.
- The continuous mode only allows the fan speed to be adjusted.
- Manual mode gives you complete control over all the settings (fan and humidity).
To change to continuous mode in some models, like the DH3020K1W, you’ll need to press the ‘minus (-) humidity control button’ until it displays ‘CO.’ Initially, it flashes for 5 seconds and then becomes constant.
To return from continuous to manual mode, press the ‘plus (+) humidity control button.’
The unit will exit the continuous mode and revert to the manual mode.
Remember that the room humidity levels aren’t shown when the unit functions in Continuous mode. In this mode, the dehumidifier will work continuously if it’s attached to a drain hose or until the water bucket is full.
4. Adjust Humidity Levels
If you select Manual mode, you can adjust the required humidity levels. Locate the humidity control button and press the plus or minus sign to increase or decrease the humidity.
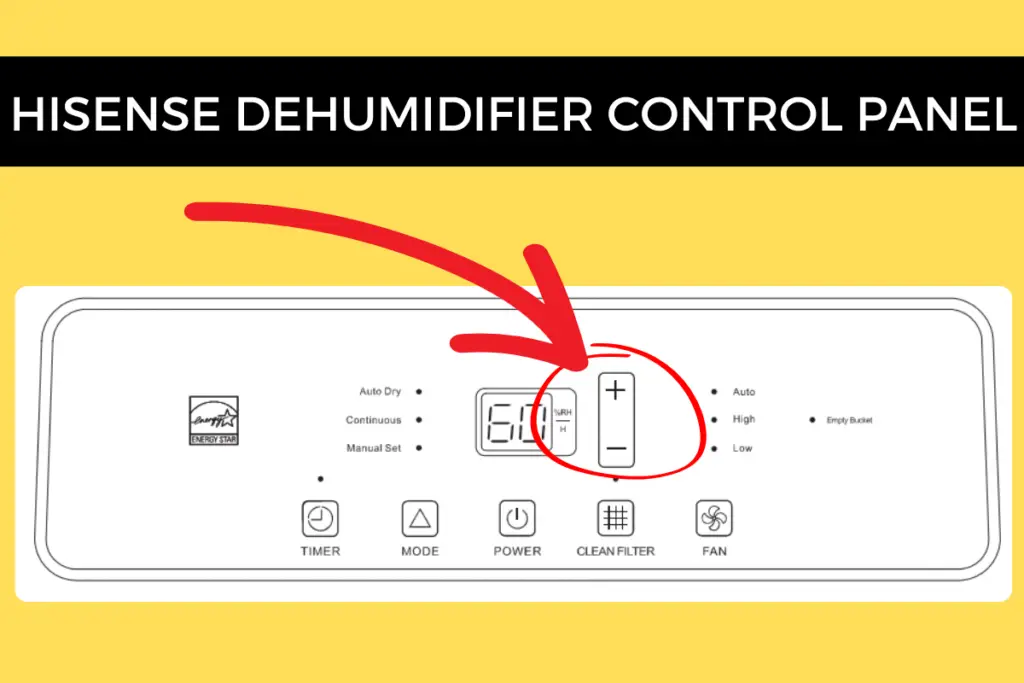
The humidity range of 30-90% relative humidity is displayed on this device.
You can set it anywhere between 30% to 80%. The desired humidity level flashes for 5 seconds in the digital display after the device starts working. Actual humidity levels of the room are displayed after 5 seconds.
You might not hear the compressor and fan sound as the desired humidity levels are achieved. This is because the compressor stops.
However, the fan periodically turns on to check the humidity levels.
5. Set the Fan Speed
Select the appropriate fan speed from low, high, to auto by pressing the FAN button. The device reaches the desired humidity levels at low speed with low sound levels.
At high speed, the humidity levels are achieved quickly, and at AUTO, the desired humidity levels are achieved at an average speed.
6. Set the Timer
Press the TIMER button to set the delay time from 30 minutes to 24 hours.
7. Turning the Dehumidifier Off
Press the POWER button to turn off the dehumidifier – it’s as easy as that!
8. Draining the Water
Water Drainage via the bucket or hose
Drain the water by removing the bucket manually or using a hose for automatic gravity drainage.
If you’re using a bucket:
- Turn off and unplug the dehumidifier.
- Locate the water bucket at the bottom of the front panel.
- Grab the sides of the water bucket and slide it out. Lift the bucket by its handle.
- Empty the water bucket into a sink or tub (or the garden)
- Reinstall the bucket by folding down the handle.
The Empty bucket light turns on when it’s time to discard the water from the bucket as it has accumulated enough water.
The compressor and fan will also stop running until the bucket is emptied.
Note: The empty bucket light can also turn on if the bucket isn’t installed correctly. Check the bucket, remove it and fit it well into the dehumidifier. This will turn the warning light off, and the dehumidifier should start its regular operationn agai.
If you’re using a hose:
- Switch off the dehumidifier.
- Remove the connector cover from the sides of the unit.
- Remove the bucket and locate the drain hose connector (included in the unit) on the side of the dehumidifier.
- Run the dehumidifier, and it will continuously drain the collected water.
Water Drainage via a Pump
Some Hisense dehumidifiers, like the HT5021KP and DH7021KP1G-6 have a built-in pump that pumps the water either vertically or horizontally.
To use the pump-drainage system, attach the drain hose to the unit and press the pump button. The pump light will turn on, and it will start draining water continuously.
9. Smart Control
The DH7021W1WG Hisense dehumidifier features WIFI control that allows you to change settings or monitor your dehumidifier from anywhere with the Hisense ConnectLife App.
This app also works with Google assistant and Alexa.
Hisense have made a great video on how to connect the dehumidifier to the ConnectLife App:
Tips On Setting Up A Hisense Dehumidifier
Here are some extra tips and facts to help you use your Hisense dehumidifier easily (and properly):
- Always plug the dehumidifier unit into a three-pronged outlet.
- Avoid using adapters or extension cords.
- The power supply requirements include a 115V power supply and 15A circuit breaker or time-delay fuse.
- Only use the dehumidifier inside (never outside)
- Avoid blocking the louvers of the unit.
- For models with a back louver, leave 12-18 inches of space on the back and sides of the dehumidifier unit. For dehumidifier models having top louvers leave 12-18 inches of space on top.
- Operate the device at a temperature range of 38°F to 90°F. The indoor temperature can rise by about 6oF as the dehumidifier runs. This is because it generates heat during operation.
- Never use the dehumidifier when temperatures are below 38°F. Water freezes inside the unit and damages it.
- Also avoid using it when it is hotter than 90°F, at these temperatures an internal protection device is triggered and your dehumidifier will be deactivated to stop it from being damaged.
- Never splash the device directly with water.
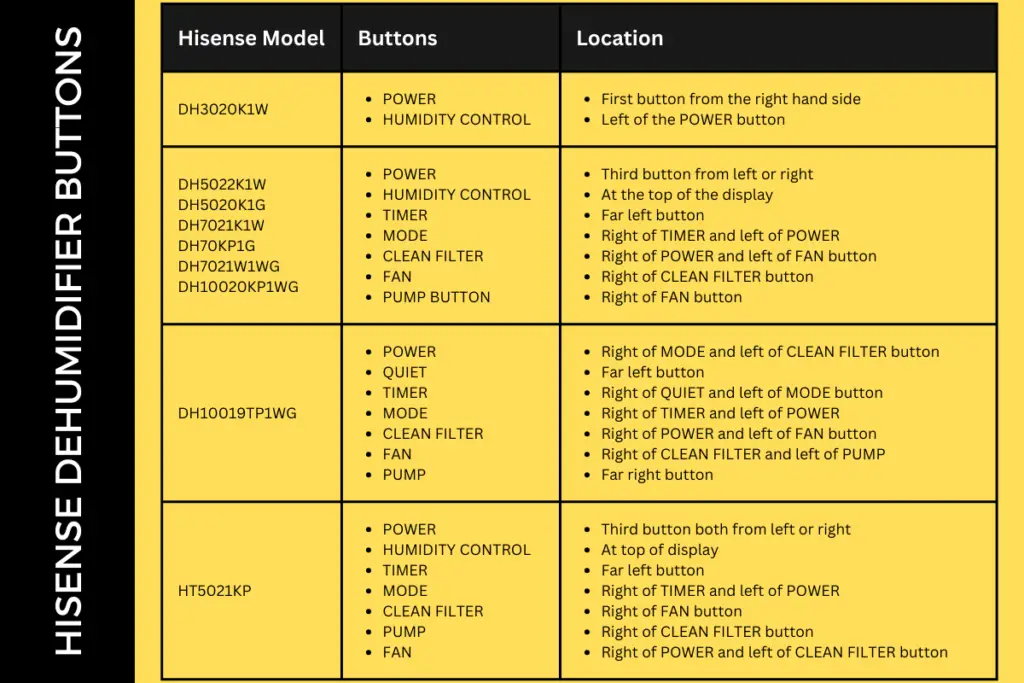
Most Hisense dehumidifiers have buttons and filters in the same places, but it does vary a little bit between the older and newer models, and the smaller and larger ones.
Button Locations
Here are the locations of different buttons on the digital control panel of Hisense dehumidifiers to make it easier for you to find:
Filter location
The air filter in all Hisense dehumidifier models is located on the back panel, excluding the DH3020K1W Hisense dehumidifier.
This model has its filter on the front panel, located just below the air intake grill.
How to Maintain a Hisense Dehumidifier
Maintaining a Hisense dehumidifier includes cleaning the exterior, water bucket, air filter, and water filter of the dehumidifier.
Cleaning the Outside
- To clean the dehumidifier, firstly turn it off and unplug it.
- Wipe off the dust from the surface of the unit using a soft cloth. You can usually just use a dry cloth for this, no water is needed. If you find you have some hardened stains you can use a damp cloth, but avoid using a truly wet one.
Cleaning the Water Bucket
- Clean the water bucket once a week.
- Hold the sides of the bucket to slide it out.
- You can see a folded handle on top. Unfold it and lift the bucket.
- Discard the water present in the bucket into a tub or sink.
- If you remove the water bucket immediately after turning off the unit, the water left in the heat exchanger unit can drip into the area where the water bucket is inserted. Wipe this water off using a clean, dry cloth.
- Wash the water bucket using a mild detergent. This will help to avoid microbial growth inside the water bucket.
- Rinse the water bucket with clean water and leave it to air dry.
- Once the water bucket is thoroughly dry, fold the handle and reinstall it inside the dehumidifier unit.
- The water bucket has a water level float. Don’t try to remove it as it might get damaged or displaced. If the water level float gets displaced from its position, the Empty bucket light will turn on. This hinders the normal operation resulting in leakage.
Cleaning the Air Filter
The clean filter light will turn on if the filter is dirty or needs replacement. The light remains for 180 hours until you press the clean filter button.
Clean or replace the filter and reset the filter monitor by pressing the clean filter button.
- Turn off the dehumidifier.
- On the backside of your dehumidifier unit, you can see a grill. The filter lies behind the grille. You can see a tab on the upper part of the grille, where your fingers can easily fit in. Hold the tab and pull out the grille.
- Remove the filter from the grill. You can either wash it or use a vacuum cleaner to get rid of the collected dust and debris.
- To wash the air filter, lay it in the sink and run warm water over it. You can also use a mild detergent for proper cleaning. Don’t use harsh chemicals for cleaning the air filter.
- Please don’t wash your air filter in a dishwasher.
- Air-dry the filter entirely. Put the air filter back into the grille and reinstall it into the dehumidifier unit.
- To reset the filter monitor, press the power button for 5 seconds after cleaning the filter.
Plentiful Air has more information on how to reset and program a Hisense dehumidifier available here.
The filters in Hisense dehumidifiers don’t need to be replaced. Check the air filter every two weeks, clean it, and put it back.
Cleaning the Water Filter (Only for Pump or Inverter Models)
Dehumidifier models with built-in pumps or inverters need their water filter cleaned every three months.
If you notice a build up of black residue in your dehumidifier, Plentiful Air has a complete guide to removing and preventing it available here.
Removing the water filter is the similar on most models, but here are the specific details to make it easier for you to follow:
For the HT5021KP model
- Take out the water bucket.
- Open the plastic nut, sealing bolt, and take off the water filter.
- Before removing the filter, place a container under the unit to collect the water that drips from the port.
- Clean the water filter using a soft brush. You can also wash the water filter with a mild detergent to ensure proper cleaning.
- Air-dry the filter after washing.
- Reinstall the water filter, sealing bolt, and plastic nut back to the unit.
- Insert the water bucket back into the dehumidifier.
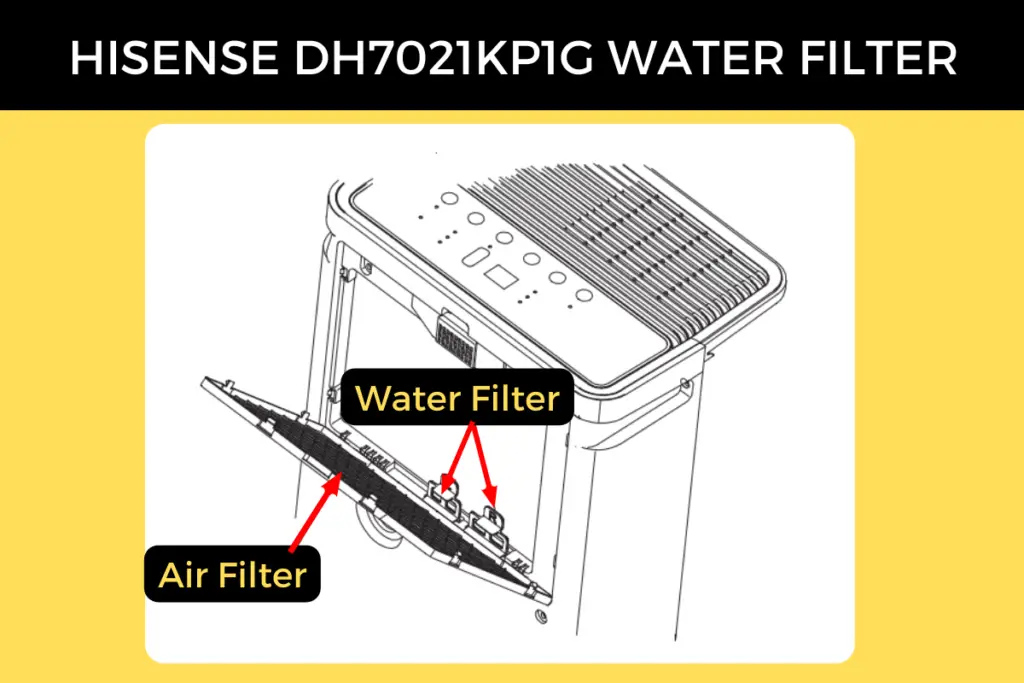
For the DH7021KP1G Model
- Remove the air filter at the backside of the unit.
- Remove the connector cover on the back of the unit and lean it down slightly at an angle of <5o. Use a container to collect water dripping from the water pan of the dehumidifier.
- Pull out the water filters situated below the air filter.
- Dust off the water filter using a soft cloth or wash it with a mild detergent.
- Rinse the water filter with clean water and leave it to air dry.
- Reinstall the water filter and air filter simultaneously.
- Your dehumidifier is ready to be used again.
For the DH10019TP1WG model
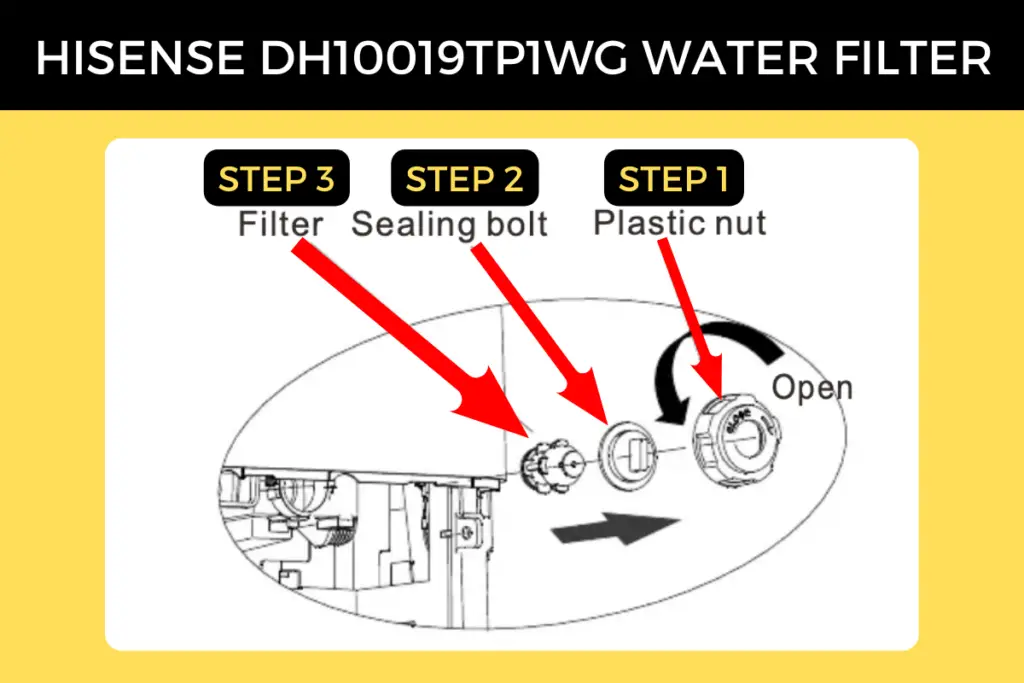
- Remove the bucket
- Put a container or draining dish under the dehumidifier
- Remove the plastic nut, sealing bolt and then remove the filter
- Clean the filter with a soft brush. If it’s very dirty you can wash it in water with a neutral detergent – so nothing acidic or very alkaline.
- Re-install the filter, sealing bolt and plastic nut back onto the dehumidifier
- Re-install the bucket